Friday, June 9, 2017

WebDriver - Find XPath

WebDriver - Find XPath


In this post we will first see how to install Firebug and later a simple example of how to use Firebug in order to find XPath.

Download and install Firebug. Its a Firefox Add-in.

Launch Firefox. Go to Tools (menu) -> Web Developer -> Get More Tools. WebDriver Find XPath

Web Developer's Toolbox page opens and install the Firebug add-on. WebDriver Find XPath

Now as the Firebug is installed, lets see a simple example of its usage to find the XPath.

Lets suppose we have this table. You can also see below the HTML code of the table.
WebDriver Find XPath

Right-click on the element, for example if we need to find element 3 in the table, right-click on it and select Inspect Element with Firebug. WebDriver Find XPath

It shows the element as HTML code as can be seen below. Right-click on it and select Copy XPath.
WebDriver Find XPath
The XPath which is copied above is:
WebDriver Find XPath

The same XPath is being used in this code to find an element and printing its text on the console.
WebDriver Find XPath

Wednesday, May 24, 2017

Selenium WebDriver Architecture

Selenium WebDriver Architecture


Suppose you are writing your tests in C# and using a common Selenium WebDriver API. That C# binding is going to send commands across the common WebDriver API. A driver (which ever you are using) is going to be listening at the other end. The driver basically interprets those commands and executes those on the actual browser. Results are returned to the code using the WebDriver API.


You write your test in lets say C# against that Selenium WebDriver API. That binding code is going to issue commands across WebDriver wire protocol (which is basically REST Based Web Service) that is able to interpret those commands. We also send HTTP requests to driver server. This driver server is an executable. Each one of the drivers has this driver server that basically listens on the port on your local machine. When the commands come in, the driver server interprets those commands and automates the browser and returns the results back.

You write WebDriver command like:
driver.findElement(By.Name("q"))

This is converted into SPI (Stateless Programming Interface):
findElement(using="name", value="q")

Then we call JSON Wire Protocol.

Selenium server uses JSON Wire Protocol commands to break down JSON object and proceed. This part of the code is dependent on which browser it is running on.

Also see: Learning Selenium Testing Tools - Third Edition by Raghavendra Prasad MG

Sunday, May 7, 2017

WebDriver - Reading XML Files

WebDriver - Reading XML Files


There can be many ways of reading an XML file using WebDriver & C# like XmlDocument, XmlReader, XDocument etc. In this post we will look into very simple examples of reading XML files using XDocument or XElement.

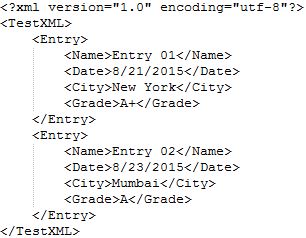
Below is the XML file ("a.XML") which we will be using in first 3 examples.


Example 1 - Reading an XML File using WebDriver & C#

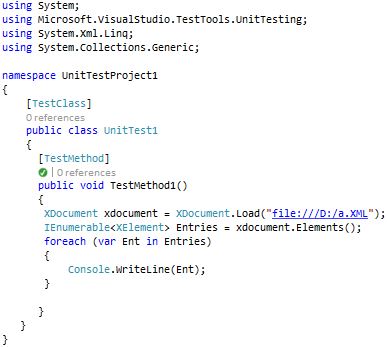
Firstly we are creating a new XDocument from file "a.XML". Load method uses an underlying XmlReader to read the XML into an XML tree. Elements() method returns a collection of the child elements. Then using foreach loop we are printing the XML document.


List of references with this project. Make sure to use System.Xml & System.Xml.Linq.


Results of running the above example


Example 2 - Reading an XML File using WebDriver & C#

This example is similar to the first one except that we are using XElement instead of XDocument.

XDocument in a way represents a whole XML document. It is normally composed of a number of elements whereas XElement represents an XML element (with attributes, children etc). It is part of a larger document. [Via]


List of references with this project


Results of running the above code


Example 3 - Reading an XML File using WebDriver & C#

In this example we are retrieving the entry names (Entry 01, Entry 02) and printing them on the console. Moreover, if we find "Entry 01", we are searching this in the google.com also. This is just one of those very simple examples where we retrieve the value from the XML file and use them in some application.


Apart from navigating to google.com and searching for "Entry 01", it also shows the below result:


Below is the XML file ("b.XML") which we will be using in this fourth example.


Example 4 - Reading an XML File using WebDriver & C#

In this example we are retrieving usernames and passwords. These usernames and passwords are further being used to login in the gmail. This is also very simple example of how you can retrieve the required values from XML and use them in some application.


Apart from navigating to gmail.com and trying to login, it also shows the below result:

Tuesday, April 11, 2017

Selenium WebDriver Framework Using PageFactory

Selenium WebDriver Framework Using PageFactory


Previously we saw how to create a simple Selenium WebDriver Framework. Here we will look into Selenium WebDriver Framework using PageFactory.

PageFactory can be called an enhanced model of Page Object Model. In PageFactory we use @FindBy annotation to locate the elements. @FindBy annotation is actually a way to pass a By object into a driver.findElement() call to create a WebElement. This call to driver.findElement() is completely transparent to you and will be performed in the background whenever you use the WebElement that has an annotation applied to it. Then we have the supported actions (or methods) which use the @FindBy annotations. These methods use the @FindBy instances which makes them unaffected by changes to the FindBy instances.

Steps to create a Selenium WebDriver Framework using PageFactory

1. Start by creating a new unit test project (File (menu) -> New -> Project). Enter Solution name and Location. I am using Microsoft Visual Studio Professional 2012.

2. In Solution Explorer, change the name of unit test from UnitTest1 to loginTest.

3. Write the below code in loginTest.cs file.

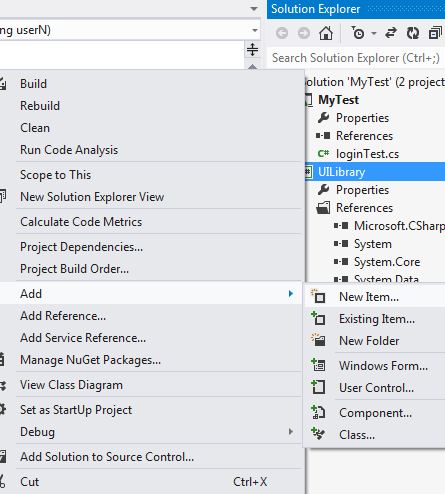
4. Right-click on Solution "MyTests" and add a new project of type Class Library. Name it UILibrary.

5. Change the name of Class1.cs under UILibrary to loginPage.cs.

6. Type the code (as seen in the below image) in loginPage Class in loginPage.cs file.

For PageFactory you need to use OpenQA.Selenium.Support.PageObjects namespace.

We have a constructor for LoginPage class. In the constructor we have PageFactory.InitElements Method. This method initializes the elements in the Page Object. It takes two paramenters i.e.
driver - The driver used to find elements on the page and
page - The Page Object to be populated with elements.

PageFactory.InitElements method throws an exception if a field or property decorated with the FindsByAttribute is not of type IWebElement or IList{IWebElement}.

FindsBy attribute marks program elements with methods by which to find a corresponding element on the page. Used in conjunction with the PageFactory, it allows you to quickly create Page Objects.

7. In UILibrary, add references for Selenium WebDriver and Selenium WebDriver Support.

8. Add a new CS file with name Driver.cs under UILibrary.

9. Add below code in the Driver.cs file.

10. Add reference to UILibrary for loginTests. In loginTest.cs, add namespace "using UILibrary".

10b.


Now run the EnterCredentialsForLogin() method and see the framework working.

Sunday, March 19, 2017

Step by Step Guide to Simple Selenium WebDriver Framework in C#

Step by Step Guide to Simple Selenium WebDriver Framework in C#


There are two parts to this post. First, we will login to Gmail without using any framework. Later we will create simple Selenium WebDriver framework with C# for the same. Obviously you will not be able to login as we are using dummy username and password in this post. I am using Microsoft Visual Studio Professional 2015.

Without WebDriver Framework

Below is the code which navigates to Gmail. Then it clicks on the SIGN IN link, enters email address as username, clicks Next, enters password and finally clicks the Sign in button.

You can take a look at the SIGN IN link, field to enter email, Next button, field to enter password and Sign in button in the next 3 images (labeled as a, b & c).
a.

b.

c.


On the last step, after entering the password, when we are clicking on Sign in button, it gives an error saying something like "wrong password...", but we are good with it as we are not trying to login successfully. We are just entering all the required information and clicking on the Sign in button.

Using Simple WebDriver Framework

1. Start by creating a new unit test project (File (menu) -> New -> Project). Enter Solution name and Solution location.


2. In Solution Explorer, change the name of unit test from UnitTest1 to loginTest.
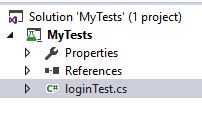

3. In loginTest.cs file, change the name of method TestMethod1() to EnterCredentialsForLogin().


4. Write below snippet of code in EnterCredentialsForLogin() method. This is how we will create our UI tests. You will notice that how easy it is to read and understand the below code like with loginPage.GoTo() we are navigating to the desired URL, then with loginPage.ClickSignInLink(), we are clicking on the Sign In link and so on. The code will show the red squiggly lines under the loginPage. Let it be as it is for the time being.


5. Right-click on Solution "MyTests" and add a new project of type Class Library. Name it UILibrary.


6. Change the name of Class1.cs under UILibrary to loginPage.cs


7. Type the code (as seen in the below image) in loginPage Class in loginPage.cs file.

Remember our EnterCredentialsForLogin() method in loginTest class. We are calling different methods for example GoTo(), ClickSignInLink() like loginPage.GoTo(), loginPage.ClickSingInLink() and so on in it. We have written these methods in loginPage class as can be seen above.

GoTo() navigates to provided URL.
In ClickSignInLink() method we are clicking on the SignIn link after finding it using CSS selector.
In EnterUserName() method we are waiting until the element is visible and then entering email address in it after finding it using Id.
In ClickNext() method we are clicking the Next button.
In EnterPassword() method, similar to EnterUserName() method, we are first waiting until the element is visible and then entering the password in it after finding it.
With ClickSignInButton() method we are just clicking the SignIn button.

8. In UILibrary add references for Selenium WebDriver and Selenium WebDriver Support.


9. Also add namespace "using OpenQA.Selenium.Support.UI;" & "using OpenQA.Selenium;" in loginPage.cs.
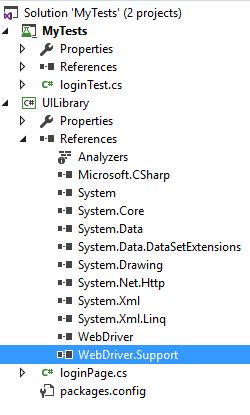

10. Add a new CS file with name Driver.cs under UILibrary.


11. After adding the Driver.cs file, Solution Explorer looks like below.


12. Add below code in Driver.cs file. Add two namespaces "using OpenQA.Selenium;" & "using OpenQA.Selenium.Firefox;". Also be sure to make class "Driver" public.


We have kept the class Driver as separate and are initializing the Firefox driver in it. This is being used by our methods written in loginPage class in loginPage.cs file. Suppose in future we need to expand our framework and add one more page like inboxPage and write some methods in it also. Then that new inboxPage can still use the Driver class in the Driver.cs file. So this makes sense to keep our Driver class separate and let others use it.

13a. Add reference to UILibrary for loginTests. In loginTest.cs, add namespace "using UILibrary".


13b.


15. In loginTest.cs also add testinitialize method so the final loginTest looks like as shown below.


Now run the EnterCredentialsForLogin() method and see the framework working.

When the framework is run the control first goes to init() in loginTests.cs. New Firefox driver is initialized here. [TestInitialize] attribute contains code which we need to run before execution of each test. Then EnterCredentailsForLogin() method is run. In the first line of this method GoTo() method of loginPage class is run which navigates to the desired URL. Then ClickSignInLink() method of the loginPage class is run which clicks on the Sign In link and so on.